Para aquellos que sufren en silencio (o no) a los diseñadores cuando les piden «aquí tiene que hacer tal efecto», «esto no está centrado» y un largo etcétera, hoy van a tener un motivo menos de excusa y uno más para odiarme.
Siendo serios, en el fondo lo vais a agradecer, ya que todos sabemos el alto porcentaje que juega el arte en el éxito nuestra app.
Vamos a hablar sobre transiciones personalizadas en Storyboard a la hora de hacer segue desde un UIViewController a otro. Para ello vamos a cambiar la típica transición por una del estilo de Flipboard con el pliegue en la horizontal.
Si bien a la hora de presentar un UIViewController de forma modal tenemos la propiedad
@property(nonatomic, assign) UIModalTransitionStyle modalTransitionStyle
que nos permite elegir entre 4 tipos distintos de transiciones, a la hora de hacer un push/pop desde el navigationController las opciones son más limitadas, vamos, que ¡nos lo vamos a tener que currar un poquito más!
Transiciones personalizadas en Storyboard – Custom segue
Creando el Storyboard
La idea que vamos a seguir, va a ser la de crear capturas de pantalla del UIViewController fuente y destino e introducir una animación utilizando Core Animation, por lo que tendremos que importar el framework QuartzCore en nuestro proyecto.
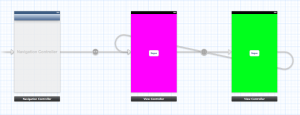
Primero creamos los dos UIViewController en Storyboard, los embebemos en un UINavigationController y creamos un segue para ir de uno a otro y viceversa.

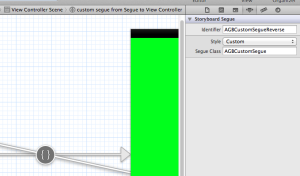
Seleccionamos los segues, los marcamos como estilo Custom y escribimos el nombre, tanto para el identificador como para la clase (que todavía no hemos definido :))

Heredando de UIStoryboardSegue
A continuación creamos la subclase de UIStoryboardSegue que nosotros hemos llamado AGBCustomSegue. Definimos dos constantes (que hemos utilizado como identificador en los segues) para diferenciar si vamos o venimos.
#define AGBCustomSegueReverse @"AGBCustomSegueReverse"
#define AGBCustomSegueForward @"AGBCustomSegueForward"
Categoría para hacer una captura de pantalla
Para realizar la captura del UIViewController fuente y destino nos creamos una categoria de UIView (por vagancia la he implementado en el fichero de implementación (.m) de la subclase que estamos creando):
@interface UIView (snapshot)

- (UIImage *)AGBSnapshotImage;

@end

@implementation UIView (snapshot)

- (UIImage *)AGBSnapshotImage
{
   CGSize mySize = self.bounds.size;
   UIGraphicsBeginImageContext(mySize);
   [self.layer renderInContext:UIGraphicsGetCurrentContext()];
   UIImage *image = UIGraphicsGetImageFromCurrentImageContext();
   UIGraphicsEndImageContext();
   return image;
}

@end
En la documentación de Apple encontramos la siguiente información en la clase UIStoryboardSegue:
Methods to Override
For custom segues, the main method you need to override is the perform method. The storyboard runtime calls this method when it is time to perform the visual transition from the view controller in sourceViewController to the view controller in destinationViewController. If you need to initialize any variables in your custom segue subclass, you can also override the initWithIdentifier:source:destination: method and initialize them in your custom implementation.
Por lo que vamos a ser buenos ciudadanos y sobrescribir perform.
Sobrescribiendo el Método Perform
Definición de los frames
Tenemos que crear dos CGRect, uno con la mitad superior y otro con la mitad inferior. Esto nos permitirá seleccionar en la captura, la parte contenida en ese rectángulo.
CGRect topRect = CGRectMake(0, 0, destImage.size.width, destImage.size.height / 2);
CGRect bottomRect = CGRectMake(0, destImage.size.height / 2, destImage.size.width, destImage.size.height / 2);
Creación de las capturas de pantalla
Primero creamos una UIImage de la captura de pantalla del UIViewController fuente con la categoría que hemos creado. Posteriormente hacemos el push/pop en función del identificador del segue, por supuesto con animated: NO, por razones obvias :). Una vez hecho el push/pop ya podemos crear una UIImage del UIViewController destino.
UIImage *sourceImage = [navigationController.view AGBSnapshotImage];

if ([self.identifier isEqualToString:AGBCustomSegueReverse]) {
    [navigationController popViewControllerAnimated:NO];
}
else {
    [navigationController pushViewController:destination animated:NO];
}

UIImage *destImage = [navigationController.view AGBSnapshotImage];
Creación de las CALayer
Con la CGRect de la parte superior creada anteriormente y la UIImage del UIViewController fuente creamos la CGImageRef que lo asignaremos a una CALayer que crearemos con ese CGRect.
CGImageRef topImage = CGImageCreateWithImageInRect(sourceImage.CGImage, topRect);
CALayer *topLayer = [CALayer layer];
topLayer.frame = topRect;
topLayer.contents = (__bridge id)topImage;
CGImageRelease(topImage);
topLayer.anchorPoint = CGPointMake(0.5, 1);
topLayer.position = CGPointMake(destImage.size.width / 2, destImage.size.height / 2);
topLayer.doubleSided = NO;
Hacemos lo propio con la parte inferior creando una nueva CALayer.
CGImageRef bottomImage = CGImageCreateWithImageInRect(sourceImage.CGImage, bottomRect);
CALayer *bottomLayer = [CALayer layer];
bottomLayer.frame = bottomRect;
bottomLayer.contents = (__bridge id)bottomImage;
CGImageRelease(bottomImage);
La última CALayer que tenemos que crear será con la imagen de la parte inferior del UIViewController destino. La pondremos detrás de la primera CALayer creada para conseguir la sensación de realismo. Para ello tendremos que marcar la propiedad doubleSided de ambas CALayer a NO.
CALayer *backLayer = [CALayer layer];
backLayer.frame = CGRectMake(0, 0, destImage.size.width, destImage.size.height / 2);
backLayer.contents = (__bridge id)backImage;
CGImageRelease(backImage);
backLayer.anchorPoint = CGPointMake(0.5, 0);
backLayer.position = CGPointMake(destImage.size.width / 2, destImage.size.height / 2);
backLayer.doubleSided = NO;
Sensación de perspectiva con CATransform3D
Opcionalmente añadimos una transformación 3D a las CALayer para dar una sensación de perspectiva cuando este rotando sobre el eje X.
CATransform3D perspectiveTransform = CATransform3DIdentity;
perspectiveTransform.m34 = -1.0 / 1000;
[navigationController.view.layer setSublayerTransform:perspectiveTransform];
Creación de la CATransaction para realizar la CABasicAnimation
Antes de realizar la animación, generamos el bloque de finalización para eliminar las layers y las animaciones, así como para volver a permitir la interacción y realizar otro segue.
[CATransaction setCompletionBlock:^{
    [topLayer removeAnimationForKey:animationName];
    [topLayer removeFromSuperlayer];

    [bottomLayer removeFromSuperlayer];

    [backLayer removeAnimationForKey:animationName];
    [backLayer removeFromSuperlayer];

    navigationController.view.userInteractionEnabled = YES;
}];
Deshabilitamos la interacción para no permitir que, mientras se esté realizando la transición, el usuario vuelva a pulsar para realizar otra, produciendo resultados no deseados. Y finalmente creamos las animaciones.
navigationController.view.userInteractionEnabled = NO;

[CATransaction begin];
{
    [CATransaction setAnimationDuration:flipDuration];
    {
        CABasicAnimation *frontFold = [CABasicAnimation animationWithKeyPath:@"transform.rotation.x"];
        frontFold.duration = flipDuration;
        frontFold.fillMode = kCAFillModeForwards;
        frontFold.fromValue = @0.0;
        frontFold.toValue = @(-M_PI);
        frontFold.removedOnCompletion = NO;
        [topLayer addAnimation:frontFold forKey:animationName];

        CABasicAnimation *backFold = [CABasicAnimation animationWithKeyPath:@"transform.rotation.x"];
        backFold.duration = flipDuration;
        backFold.fillMode = kCAFillModeForwards;
        backFold.fromValue = @(M_PI);
        backFold.toValue = @0.0;
        backFold.removedOnCompletion = NO;
        [backLayer addAnimation:backFold forKey:animationName];
    }
}
[CATransaction commit];


